


The Role of Post-Processing in Creating Aesthetic Transparent Prototypes with Clear Pro 3D Printing Resin
 2025.12.26
  NextShapes,Clear Pro,3D Printing
  <1 minute
 ![]()
![]()
![]()

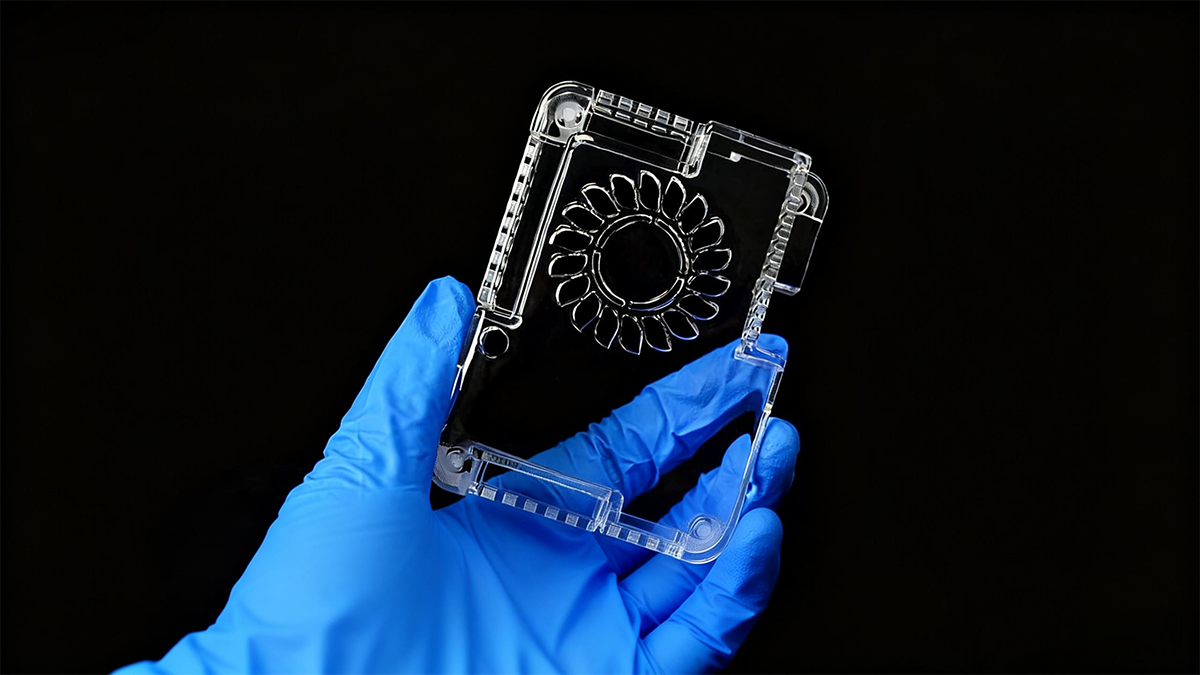
Traditional transparent prototype production often relies on expensive, time-consuming CNC machining or injection molding, making it difficult to meet the fast iteration needs of modern product design. With the maturation of high-precision photopolymerization LCD 3D printing technologies, a new digital workflow for transparent prototypes has emerged. NextShapes' Clear Pro resin has proven to be a reliable choice for creating high-quality, aesthetic transparent prototypes, combining excellent optical performance with an efficient and user-friendly 3D printing process.
Clear Pro's numerous characteristics make it an ideal material for design studios, product development departments, and professional model service providers to economically and consistently scale up transparent prototype production. As a ready-to-use resin, its storage and usage conditions are no different from typical 3D resin and do not require special workshop environments. Compared to industrial-grade transparent materials or outsourced services that cost several times more, Clear Pro can achieve optical clarity and dimensional stability comparable to engineering plastics on a desktop 3D print, enabling users to seamlessly transition from outsourcing or traditional processes to fast in-house digital manufacturing. Its high hardness and ease of cleaning further simplify the post-processing workflow.
This article focuses on two key but often overlooked aspects of the Clear Pro workflow—systematic post-curing control and optimized cleaning strategies—and their decisive impact on the final prototype’s optical quality and production efficiency.
![]()
Why is Post-Curing Control Important for Transparent 3D Print Resins?
An adequate and controlled post-curing process is essential for unlocking the full optical and mechanical properties of Clear Pro. When the 3D print is complete, the resin’s polymerization reaction has not fully finished, and internal stresses may remain, affecting long-term dimensional stability and final hardness. Systematic post-curing ensures the resin is fully crosslinked, thus achieving the highest transparency, best chemical resistance, and stable mechanical strength as intended by the design.
Lack of control or improper post-curing (e.g., direct sunlight, non-professional curing units) may result in yellowing, brittleness, or micro-cracks due to internal stresses. Using professional post-curing equipment to standardize the process ensures that every transparent prototype achieves consistent and optimized performance, which is critical for prototypes with professional-grade aesthetics.
For transparent prototypes that require strict aesthetic standards using Clear Pro, we strongly recommend adopting a professional post-curing process to achieve superior optical results while ensuring durability and dimensional accuracy.
Implementing Professional Post-Curing
To fully harness the potential of Clear Pro, it is recommended to use dedicated ultraviolet (UV) post-curing equipment. Clear Pro is compatible with mainstream 405 nm wavelength post-curing boxes available on the market. An ideal post-curing solution should meet the following criteria:
- 1.Light Source Wavelength: The main wavelength should match 405 nm for efficient triggering of full crosslinking of the resin.
- 2.Light Uniformity: The curing chamber should have even light distribution to avoid uneven curing in different parts of the model.
- 3.Rotating Functionality: The post-curing unit should feature an automatic rotating platform to ensure uniform light exposure on all angles of the 3D printing models.
- 4.Time and Intensity Control: The ability to set precise curing times, with some units also supporting intensity adjustments.

Choosing Post-Curing Equipment
Professional post-curing units provide a controlled and repeatable environment, making them the preferred choice for ensuring quality consistency. Their primary advantage lies in eliminating environmental variables (e.g., sunlight intensity changes, temperature fluctuations), ensuring that the curing results are predictable every time. For applications where high-quality transparent 3D print materials are frequently used, this investment is essential.
Simplified Curing Alternatives
For initial trials or very low-frequency use, you might consider using a small 405 nm UV light in a well-ventilated area, avoiding direct sunlight, for initial curing. However, this method cannot match the uniformity, efficiency, and consistency of professional equipment. The choice of the best solution depends on the quality requirements of the prototype, production frequency, and budget.
Establishing a Standard Post-Curing Process
Once suitable curing equipment is acquired, a Standard Operating Procedure (SOP) should be established and strictly followed. This includes:
- 1.Cleaning the 3D printing models thoroughly before sending them to the curing chamber after printing.
- 2.Setting the curing time according to the size and shape of the model, referencing the 3D print materials, and referencing the recommended parameters.
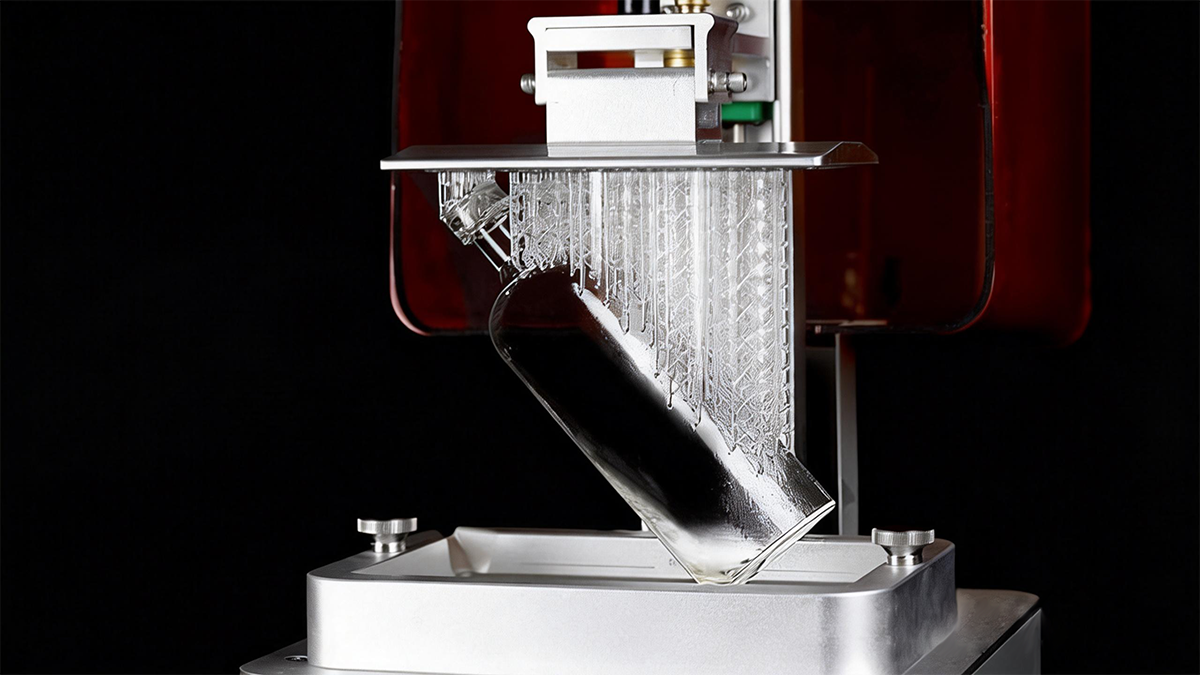
- 3.Placing the model in the optimal position (typically on its side or using support structures) on the rotating platform.
- 4.Recording curing parameters for each batch to ensure traceability and optimization.
What is a Cleaning Strategy?
A cleaning strategy refers to the complete method used to remove residual uncured resin from the surface of the model after 3D printing, including solvent selection, cleaning methods, timing, and drying processes.
Any liquid resin remaining on the surface before support removal must be effectively cleaned. Improper cleaning can lead to sticky surfaces, reduced transparency, or cloud-like streaks after post-curing. An optimized cleaning strategy aims to achieve the most thorough cleaning with the least solvent usage while ensuring safety and efficiency in the process. For high-transparent resins like Clear Pro, the thoroughness of cleaning directly impacts the final optical clarity.
The Synergy Between Cleaning Strategies and Post-Curing Control
Residual uncured resin on the model surface may crosslink during post-curing, but its optical performance will differ from the main body, leading to a cloudy surface or internal streaks, severely damaging transparency. Therefore, thorough cleaning is the prerequisite for achieving high transparency, while sufficient post-curing ensures that the transparency effect is locked in and gives the model strength. Both processes are indispensable, and the order in which they are performed is crucial.
If cleaning is incomplete, even extending post-curing time cannot salvage the optical quality of the contaminated surface. Conversely, if cleaning is thorough but post-curing is insufficient, the model’s long-term stability and hardness will not meet the required standards. For aesthetic transparent prototypes, cleaning and post-curing must be viewed as a coherent process and strictly controlled.
Setting Your Cleaning Strategy
You can base your cleaning strategy on the following factors:
- 1.Cleaning Solvent Selection: We recommend using professional bio-based cleaning fluids, which are compatible with Clear Pro.
- 2.Cleaning Method: Use a two-tank cleaning method: the first tank for major cleaning to remove most of the resin; the second tank for a fine rinse to ensure the model is thoroughly cleaned. This method extends the life of the cleaning solution and improves cleaning quality.
- 3.Ultrasonic Cleaning: Effective for fine-structured models, but time and power should be strictly controlled to avoid cracking or overheating.
- 4.Cleaning Time: Adjust according to model volume and complexity; typically, 2-5 minutes is sufficient. Avoid prolonged soaking to prevent resin swelling.
- 5.Drying: After cleaning, use a lint-free cloth to wipe away surface liquids and dry thoroughly in a well-ventilated area or with compressed air, ensuring all cleaning fluids evaporate before post-curing.

Balancing Cost and Quality
To achieve the most cost-effective workflow, solvent management should be optimized while ensuring high cleaning quality. Using the two-tank cleaning method, regularly filtering and replenishing cleaning fluids can significantly reduce the cleaning cost per model. At the same time, standardizing cleaning and post-curing processes reduces trial-and-error and waste, lowering prototype production costs and improving delivery reliability.
Limitations of Simple Cleaning Solutions
Using a single-tank cleaning method or insufficient cleaning time can lead to inconsistent prototype quality and surface defects. We strongly recommend establishing and implementing an optimized combined cleaning and post-curing process for Clear Pro models to consistently achieve the best optical and mechanical performance. If the prototype's transparency does not meet expectations, start by checking and improving the cleaning process, then verify post-curing parameters.
Revolutionizing Desktop Photopolymerization for Aesthetic Prototypes
Although transparent prototypes have significant value in product design reviews, functional demonstrations, and market research, traditional production bottlenecks often force teams to make compromises between cost, time, and quality. With high-performance desktop materials like Clear Pro and the maturation of refined post-processing solutions, the transparent prototype production process has been greatly simplified.
NextShapes Clear Pro, along with its complete workflow solution, has become an ideal choice for teams looking to transition from outsourcing to in-house rapid 3D printing. By strictly controlling cleaning and post-curing processes, Clear Pro can consistently deliver prototypes with outstanding optical clarity, high hardness, and dimensional accuracy. Combined with an easy-to-use, compact desktop LCD 3D printing ecosystem, in-house production of high-quality, aesthetic transparent prototypes has never been more accessible, opening the door to broader design validation and creative realization.
Getting Started with Clear Pro for Aesthetic Transparent Prototypes
If you wish to integrate the high transparency and stable performance of Clear Pro into your workflow, we recommend first consulting the detailed product manual for comprehensive and safe operational guidelines.
If you need a technical evaluation or a quote for specific applications (e.g., transparent enclosures, optical components, or complex assemblies), feel free to contact our sales and technical support team. Our experts will provide one-on-one consultation to help you smoothly start your journey into in-house manufacturing of high-quality transparent prototypes.
![]()
![]()
